
It’s a three ring circus, well – a three tent circus.
This is the inaugural blog for a series of adventures with my friend Renau. We have decided to take life by the balls and to try out new things, new places and new activities. While discussing how we would go about accomplishing all these things, Renau was trying to tell me she had sketchy cell service and instead she said “Sketchy Circus” – and with that slip of the tongue, our adventure gained its name.
PLEASE NOTE: We are not professional anythings. Well, we are professional at some things just not when it comes to being an “expert” camper, hiker, gear user, etc. This blog is for entertainment purposes and to express our own opinions on what we use and see while camping.
Because this is like character development in a movie series, you will have to bear with this blog being a tad bit longish (ha ish). Once our gear is described, the only other time we will have that lengthy detail will be if we change or try out new gear. So, next blog will be more about location and less about neither of us being able to stand straight up in our tents. Thank you for your patience while we are under construction…
We have created a Facebook Page: https://www.facebook.com/SketchyCircus/ Through the FB page and this blog we will chronicle our adventures and give you the pros and cons from our perspectives while photographing the experience and “over sharing” our thoughts. Be prepared, if “too much of a good thing” is not your style – then this page and blog might not be for you. We both love to camp, so the majority of those adventures will be while on some type of camping trip. For consistency’s sake, the blogs will be setup in the same general format with little variations: Location Description – Camp Setup – Camp Hacks/New Gear – Food – Location and Activity Details – The Peanut Gallery (this will be Renau’s notes on the adventure) – The Verdict (would we recommend the location/site) – Additional Photos.
Now, without further ado – our blog on Cave Run Lake / Zilpo Campground.
Location Description: Cave Run Lake / Zilpo Campground, 79-99 Center St, Salt Lick, KY 40371 . Phone: (606) 768-2701. Rates (for Site 130) $22/night. Online Reservations: http://www.recreation.gov/camping/zilpo–daniel-boone-nat-for/r/campgroundDetails.do?contractCode=NRSO&parkId=70761
Reason we chose this location: Because we were leaving RIGHT after work on a Friday, we wanted a close-ish drive. This location is in Daniel Boone National Forest and therefore is close to an NPS Visitor Center. Both Renau and I collect stamps in our NPS Passports: http://www.eparks.com/store/product/22515/Passport-To-Your-National-Parks%C2%AE/
Pros (for our specific site/stay): ** The sites closest to ours were all empty. ** The area was quiet. ** Wildlife was plentiful and easy to photograph. ** There were two hook-poles for running a rope or hanging things to dry. ** All of the staff and cleanup crew were amazingly nice and easy to talk to. ** There is a clean swimming beach. ** Campsite was spacious.
Cons (for our specific site/stay): ** Out in the middle of nowhere – ie: make sure to bring ample supplies of things not normally carried in a campground store. *** Little-To-No cellphone service. *** No electric or water hookup.
Update: My Yelp review of the campground – YELP!
Camp Setup:

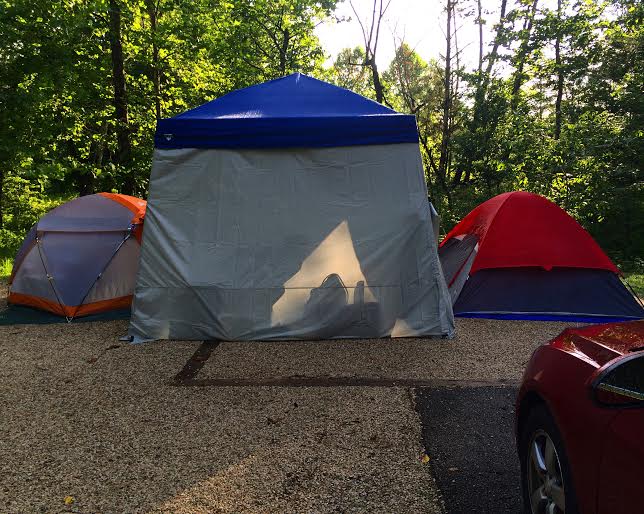
Before setting up the tents or canopy, we first put down tarps to act as an extra barrier in the event of wet ground/rain (thankful we did that). We used the tarps to map out placement. The canopy in the middle would be the common area, using a half-canopy rain fly to add privacy (blocked immediate view from the camp road). Going forward we will check weather statuses a little more closely. If there is rain, we will pull the tents into the canopy a little further (center of dome just past the awning to allow rain to spill down the back of the tent and not into an open rain fly – yeah, it happened).

That picture is from inside my tent the morning after the rain. Because we were unable to check weather status (no cell service) and at last check on the road – weather.com showed only a 10% chance of precipitation, I rolled my rain fly up to look at the stars and to catch a good breeze as it was very humid Friday evening. The open mesh area left uncovered was in perfect alignment with the edge of the canopy. When the gully-washer came at 3:00 AM, it was as if I had been waterboarded. Nothing like a cold (felt like a) bucket of water in my sleeping face. Live and learn. Next time, different tent-to-canopy placement.
My tent is an Ozark Trail 9×8 Dome Trail Tent. This tent is on loan from my husband who used it through his skydive boogie days. It is advertised to sleep 2-3. It is large enough for me to use my Coleman cot (with padding and bedding) while leaving ample room to get around. The tent has a center height of 4 feet. I cannot stand up in it but it is not like I stand around in my tent while camping. There is a mesh bag configuration that hangs at the back of the tent that is good for cough drops, flashlight, headlamp and cell phone. It took me about ten minutes to set up unassisted. The rain in the tent was my fault and not a leak in the tent. My one issue with the tent is that with the rain fly rolled down and zipped it was rather stuffy. When the sun started coming up it became warm enough to wake me up. I would like to invest in a rain fly that does not fully enclose or has space between it and the tent to allow some airflow. I would also like to invest in a small battery powered fan for the center of the dome. Currently I use a small battery powered lantern that came with the tent. It allows ample light while getting ready for bed. I will research a few accessories before our next adventure.


Notes from Renau on her tent: I purchased my Ozark Trail 4 person dome tent for $39.96 at “The Wal-Mart” in 2015. I have set it up 5 times and slept in it about 12 times. I have set it up by myself with ease and quickly. I use my full size air mattress in it and have room to place odds and ends. It has held up in a high wind thunderstorm in South Carolina and in a thunderstorm in Kentucky with no water breaching the tent in either instance. I enjoy sleeping in it solo but would be cramped with another person in it with me (much less with 4 people in total as advertised). I do wish it were tall enough for me to stand up in. Overall, I am pleased with it and have gotten my money’s worth out of it already. I would definitely purchase another Ozark Trail tent.


Canopy: We discussed at length what would make our setup more comfortable while being economical and realizing limitations on hauling space. We decided a canopy would be the best bet and would allow us a common area that is shielded (at least somewhat) from the elements. On the weekend of July 4th, Dick’s Sporting Goods had a huge sale and that was when I happened to be doing the research. There we found the 10×10 Canopy by Quest. It was normally $99.99 and we picked it up for $49.98. In addition, we bought the half-canopy wind screen for additional privacy. In reading the reviews, there were a number of concerns regarding whether it is truly 10×10. We did not measure it and felt fortunate that the size (whatever it was) was perfect for our needs. The actual canopy is 8×8 and the legs slant outward to give it a larger base. It was relatively easy to set up. It takes two people to stretch out the frame. The canopy attached to the frame by velcro. The wind screen we purchased ($29.99) fit onto the canopy’s metal frame by plastic hooks. The screen has a zipper, if you bought another screen the canopy would be completely enclosed. We used a 12×12 tarp as a floor to the canopy, which worked perfectly. At some point, if we camp in a highly populated campground, it might be beneficial to purchase the second wind screen to be completely private. For this trip, we placed the wind screen on side of the canopy facing the campground road and the open side faced the forest. Using a large citronella candle for lighting in this area was adequate as both of us used headlamps when walking about the campsite. We believe the canopy/wind screen combo was WELL worth the money. Saturday morning, after the heavy rain Friday night, we had some water in the canopy. We do not know if that was from condensation (high humidity/rain/drop in temp) or a leak. Prior to the next adventure we will coat it with scotch guard and then report back if it rains. Reanu brought clothes pins and we used the frame of the canopy to hang wet towels and wash cloths. That proved to be very handy.
Camp Hacks/New Gear:
I placed a $5 door mat from Family Dollar just inside the door of my tent. Of course the first night’s rain made it a little damp but it otherwise was a great accessory as I preferred it when I was barefoot over the tarp-like bottom of the tent.
Once setup was finished, we sprayed bug spray on the doors/mesh areas of our tents hoping to repel skeeters. Not sure if that was what worked but (knock on wood), I came away with no bites.
When prepping for this camping trip, I turned to Pintrest and the hacks there are plentiful! That is where I came across the plastic drawer hack. Below is a picture of what I am speaking of. The one I found ($15 at Family Dollar) was black and the top drawer was smaller. In the top drawer I placed plastic cutlery, cooking utensils, tongs, wooden spoons, toothpicks. In the second drawer I placed plates, bowls, Clorox wipes, table cloth, table clamps. In the third drawer was non-eating items like firestarter small logs, candles, Funky Flames (will review in another blog and post link here later), etc. We both HIGHLY suggest this hack. It was very useful.

The last hack I will mention in this blog: Duraflame FireStart. I cannot sing its praise enough! We arrived late to camp so we were not able to purchase firewood. It had rained for days prior so there was no dry wood to be found lying around the campsite. The first night we used the camp stove and it worked like a dream. We had a meal and tea and to bed we went. In the middle of the night, when it rained hard, I had left the camp stove out to cool off and neglected to put it away. It was flooded the next morning and I could not get it to work. So at 7AM – no dry wood, no purchased firewood, out in the middle of nowhere, closest place to buy a cup of coffee at least a thirty minute drive away…I decided to use the FireStart I kept in the bottom drawer. It burns for like two hours (small size). We used the grill from the camp stove (the fire pit grill was wedged into place and unusable). We were able to make coffee and breakfast. We will always have one of these in the drawers for cases of coffee-emergencies.

![IMG_3701[1]](https://seletyn.com/wp-content/uploads/2016/07/img_37011.jpg?w=303&h=404)
Food:
We decided for the first night’s meal (because that would be the night of setting up camp and arriving late) Renau would pre-prep Tacos In A Bag. That is where you take an individual sized bag of Fritos, dump in taco meat and fixings. Because we did not get the Fritos, Renau had a bag of scoops. We used bowls, put the scoops in and dumped everything on top. Was delicious. This was the only meal we used the camp stove for as it was a victim of the rain and did not work after that first meal.
On the way to the campground we stopped at the WalMart to stock up on various food stuffs. We bought egg beaters in a carton (easier to store, pour and not break shells). Polish Sausage was another purchase – it is precooked meat that is already seasoned and would be less likely to spoil like a raw meat. We used it for both Silver Turtles and Sunday morning breakfast. Renau had prepped veggies at home so we had onions, peppers and tomatoes for multiple meals which were already sliced and in baggies. The Silver Turtles were dinner for Saturday night. A Silver Turtle is where you take foil, make a packet and then add meat and veggies and once sealed, place it on the coals of the fire to cook. When grabbing the egg beaters, there was a package of pre cut frozen Bob Evans potatoes seasoned with paprika. Best impulse buy ever! These were used in the Silver Turtles and for Sunday morning breakfast. Along with Reanu’s Silver Turtles, I made Cinnamon Apples by taking the apple core remover utensil thingy and using it to slice and remove the core at the same time – then I inserted Kelly’s Irish Butter, cinnamon and honey – wrap in foil and throw on the coals along with the Turtles. Saturday night’s dinner was A-MAZING!
Things we learned for the next adventure: remember to bring both potholders and Pam cooking spray. We used butter and the Polish Sausage has a certain amount of grease. However, for cooking the eggs it would have been helpful to have Pam. For Sunday morning breakfast we basically threw in all of the leftover veggies, sausage and egg beaters into a foil-lined skillet and cooked the whole mess together. We used Renau’s campfire toaster to toast some cinnamon raisin bread. Also, we will carry charcoal on our next adventure as well. We picked up a bag at the camp store and used it (along with firewood) for Saturday dinner and Sunday breakfast.


Location Details / Activities: Because of its remote location, for this campsite we would suggest you enjoy a swim at the campground beach. It is a pebble beach that was not crowded at all for the morning hours. More people arrived after noon. But even then it was not very crowded. We were unable to enjoy the trails because we wore ourselves out breaking camp in the direct sun on Sunday. We will do that next year.
On Saturday we drove to Carter Caves, Carter County KY which is an hour away and explored a little. Our big draw to the caves was watching Goonies inside a cave. I will blog about that separately and update this blog with its link once available. Update: The Goonies Blog
On our way home Sunday, we made a stop at the NPS visitor’s center that was close by. We were able to get our NPS Passports stamped. As we were approaching the interstate, we saw a restaurant: Pop’s BBQ and decided to stop. It was amazingly delicious and not expensive at all! They had a number of “stuffed animals” in various positions that were pretty hilarious. I will review the restaurant on Yelp and post a link here as an update when it is available. We would highly recommend the spot!
Update: Pop’s Yelp Review
![IMG_3901[1].PNG](https://seletyn.com/wp-content/uploads/2016/07/img_39011.png?w=389)
The Peanut Gallery: I will get more “notes” from Renau about her fave parts and least fave parts and update at a later time. In the interim, I think she enjoyed herself:

Verdict: We are planning on returning here on the one year anniversary of Sketchy Circus. We would recommend this campground (while reinforcing that it is a little bit far from civilization).
Additional Adventure Photos: ***Note: Because I am trying to pack for a trip to Boston, I am posting the blog without the additional photos. I will come back and update with pics and a couple additional links as soon as I can.
We hope you enjoyed our first Sketchy Circus blog. Let us know your camping suggestions, ideas for locations and thoughts. We appreciate all comments and feedback.
AND – Ozark: if you are reading, we would love to blog about your products. What we have used so far have been very effective. So, if you are in the market to have your gear reviewed – well, we are the girls to do it for you!
Peace, Love and Adventure!
